Encountering Oculus Quest 2 not connecting on Windows PC? Don’t worry, you are not all alone. Numerous Windows users have lately reported the same trouble while trying to connect the all-in-one most innovative and highly advanced VR system. It could occur due to outdated device drivers, faulty USB power settings, damaged USB ports or cables, and many more. Well, whatever the reason is, you can get rid of the problem pretty easily & quickly.
We have created this troubleshooting guide to explain the best strategies on how to fix Oculus Quest 2 not connecting. Without a bit of delay, let’s shift to the next section.
It’s frustrating when you connect Quest 2 to your PC but nothing happens – your computer just won’t recognize it. You’re not alone! Many users have reported the same issue. But you can fix it. Check the fixes below!
Fix 1: Check PC Specifications
Before discussing complex solutions, let’s see if your PC is even capable of running Oculus Quest 2 headsets.
The minimum PC specifications for Oculus Quest 2 are:-
OS: Windows 10
Port: USB 3.0
CPU: Intel Core i5-4590 or an AMD Ryzen 5 1500X
Graphics: Nvidia GTX 970, 1060 3GB and above.
Important: A point to remember is that includes all the GTX 16-series graphics cards, except for the GTX 1650. Other than that, AMD RX 500, 600, 5000, and Vega series may do the job.
Memory: 8 GB
Now, follow these steps to quickly check your PC specifications:
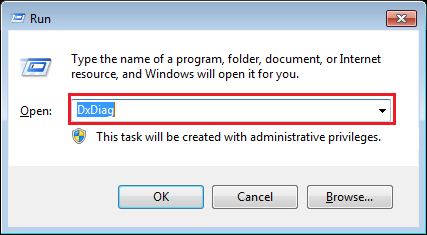
Step 1: On your keyboard, press the Windows logo key and R simultaneously to prompt the Run dialog box.
Step 2: Then, type dxdiag and click on OK.

Step 3: Check your Operating System, Processor, and Memory.
Step 4: After that, click on the Display tab to check your graphics card’s information.
If your PC meets all the needed specs, let’s move on to the next fix.
Fix 2: Check USB Cable/Port
Want to know “how to connect Quest 2 to your PC properly?”. In order to connect your Oculus Quest to your PC, you’re going to have a high-quality USB cable that can take care of data and power, simultaneously. You can purchase the cable from Oculus for $79 or you can utilize a third-party cable, like Anker cable which amounts lesser than the original.
If you are going to buy a new wire do ensure that it’s at least 3 meters long so you can take a walk around and have a more convenient experience.
You can also try to use another USB port to check if the problem is caused by your USB port.
At last, reset the Link cable on both ends(headsets and PC) to make sure that all the connections to your PC are safe and secure.
Fix 3: Updating Oculus Software
To ensure the seamless performance of the Oculus Link on your PC, make sure that you’re using the Oculus app and it’s updated. If not, just go to the Oculus support page and find the latest version of the app.
Fix 4. Log Out of Your Account and Log Back In
It may seem simple, but this works for many users. Sometimes, just logging out of the PC software and logging back in can fix temporary issues with your Quest.
Fix 5: Reboot Your System And Devices
If you’ve not tried this yet, what you’re doing? Give it a shot. A simple reboot can reset the software, PC’s ecosystem, and can also lead to fixing multiple similar glitches.
Just close the Oculus Quest, and then shut down your PC. Wait for a while, and then turn back on your PC to see if the issues have been solved or not.
Fix 6: Turn off USB Power Settings
If none of the above-mentioned tactics helped you, then consider disabling the USB power settings that might work. Here is how to do that:
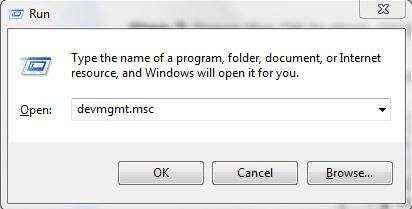
Step 1: Simultaneously hit Windows logo + R keyboard keys to open Run Dialog Box.
Step 2: Then, input devmgmt.msc inside the run dialog box, and press Enter key.

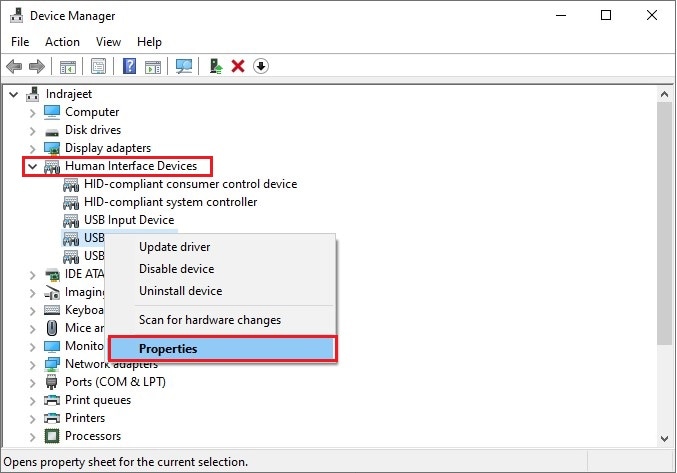
Step 3: After that, navigate to the Human Interface Device and expand its category.
Step 4: Make a click right on the USB Input Device.
Step 5: Next, choose Properties.

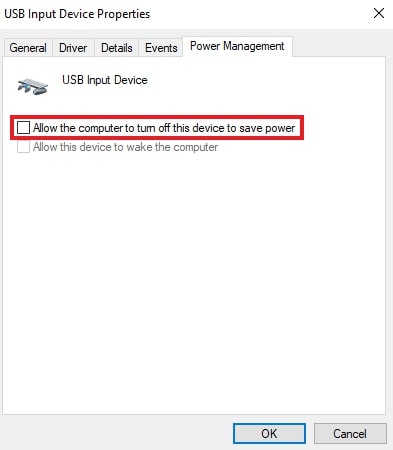
Step 6: On the next window, head to the Power Management.

Step 7: And, make sure the box presented before Allow the computer to turn off this device to save power is unmarked. At last, click on OK.
Once done, then restart your computer and check to see if the issue has been resolved.
Fix 7. Factory Reset Your Quest
This can fix several problems with the Quest. But before you proceed, note that this will delete your game data. You’ll need to download all of your games after this.
To factory reset your Quest 2, follow the instructions below:
1) Press and hold the power and volume buttons until it turns on.
2) Highlight Factory reset, then press the power button to select it.
3) Select Yes, erase and factory reset, then press the power button to initiate the reset.
Hopefully, now Oculus Quest 2 not connecting to Windows 10, 8, 7 PC won’t bother you anymore. In this tutorial, we have discussed the easy and most workable tactics to fix this inconvenience.
I am Komal Hatwaani, aims to provide readers with informative and engaging content that covers everything from technology and business to entertainment and lifestyle. This website dedicated to delivering high-quality content that informs, entertains, and inspires our readers.
Join us on our journey as we continue to explore the ever-evolving landscape of news and information, providing you with valuable insights and perspectives that enrich your digital experience.