Follow the steps here below connect epson printer to wifi network also if your printer not connecting to your wifi network check the step wise solution below here:
Connect Epson Printer to wireless router
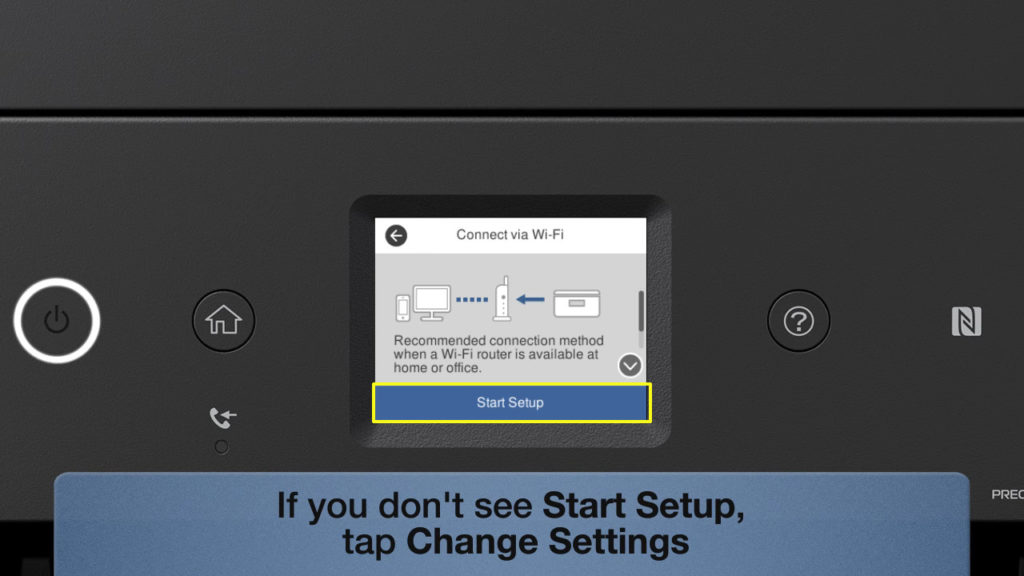
STEP 1 – Press the home button

STEP 2 – You need to select the Wi-Fi icon

STEP 3 – From the prompt screen, select Wi-Fi (Recommended).

STEP 4 – In this step, you need to select Change Settings or Start Setup.

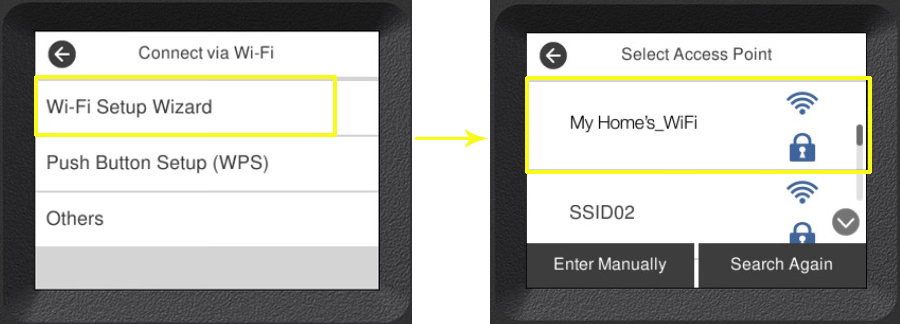
STEP 5 – Now, select the first option on the next screen “Wi-Fi Setup Wizard” and printer will search for wireless network > select your network name then tap ok button on the printer.

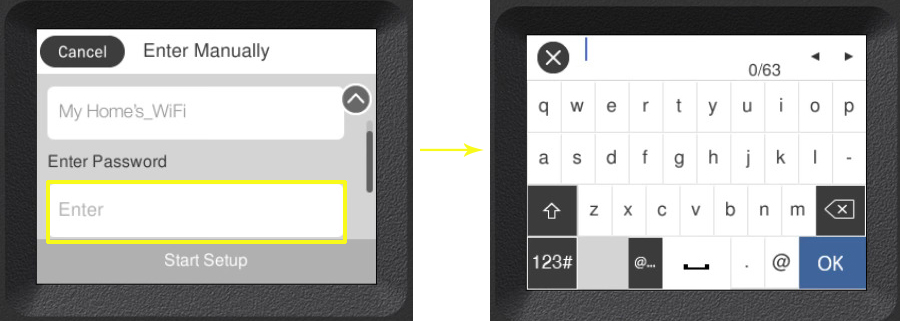
STEP 6 -Now Enter the password for network key using the navigation button key on the printer.

FINAL STEP – After you enter the password and tap OK, you should tap Start Setup. The printer will then connect to your Wi-Fi, notify you that the Wi-Fi setup is complete, and ask you to print the connection check report. If you don’t need the report, click OK.

So by using above steps you can easily connect your Epson printer to wifi network
Steps on How to Connect Epson printer to wifi Windows computer
- For this first switch on your printer, router and computer
- Connect printer with router using above steps.
- Then go to the Epson website to download and install the printer driver for your model number.
- Once installation completed tap on windows search and type Run command to open the Run Dialog box > type control click ok button.

- Select the Device and printer > if printer is not available tap on ‘Add printer’ on the top left corner


- Select your printer model from the appear list and click next to follow the further process once it added will shown with Green checkmark.
So you have successfully learn here how to connect Epson printer to wifi network using windows computer
Steps on How to Connect Epson printer to wifi MAC computer
- Here in this process make sure all device must be turn on
- Then connect your printer with wifi router ( as reamended in the first section above here).
- Download and complete installation for Epson printer driver using website.
- Then go to MAC menu > tap system references > Printer and Scanner.


- Tap on + sign to add printer from drop and down menu .

- Once it added will appear in the left side of cone.
So finally you have connected Epson printer to wifi network on MAC PC.
Learn here Why is my Epson not connecting to Wi-Fi?
Suppose your Epson printer is connected to Wi-Fi, but the computer can’t find it. In that case, it could happen due to a driver glitch, printer error, corrupt or incorrect printer configuration, and even issues with your wireless network.
- Incorrect WiFi Password
- Network Connection Issues
- Printer Software Issues
- Firewall or Security Settings
Without further ado, let’s see what you can do about the Epson printer not connecting to the Wi-Fi issue. Follow along!
Steps to fix the Epson printer not won’t connect to Wi-Fi Network?
1. Update printer driver software
- Tap on the Windows icon on the taskbar > search “Control Panel” and then enter.

- Select “Devices and Printers”.

- Now right-click on your printer model > select “Printer Properties”.

- Select the “Hardware” tab > click on the “Properties” button.
- From the Properties window > select the “Driver” tab.
- Then tap on the “Update Driver” button.
- Follow the on-screen instructions to complete the driver update process.
- Once the update is complete, restart your computer to ensure that the changes take effect.
2. Check and configure printer port settings
- Press the Windows key + R to open Run. Type control and click OK to open the Control Panel.
- In Control Panel, go to Hardware and Sound and then click on Device and Printers.
- Right-click on your printer and choose Printer Properties.
- In the Properties window, open the Ports tab.
- Check if the correct port is assigned to the printer.
- You can set the correct port using the IJNetwork Tool. For example, select your printer and use Associate Port in the Settings menu.
- Click Apply and OK to save the changes.
3. Check your network connection
If your Epson printer won’t connect to a new router, make sure your network is discoverable to other devices.
Next, check your network connectivity. Make sure that your router and modem are working correctly, and that your printer is in range of your WiFi network. If your printer is too far away from your router, move it closer and try again.
4. Perform a power cycle
- Please turn off your printer and wait for it to shut down entirely.
- Next, turn off your network device or Wi-Fi router.
- Disconnect all the wires connected to the printer and router. Leave the devices idle for a few minutes.
- Next, connect the cords to the printer and router and power on the devices.
- When the lights on your router stop blinking, try connecting to the Wi-Fi network and check if the issue is resolved.
5. Clear cache
- Turn off the printer.
- Next, press and hold the feed button for a few seconds. Then power on the printer while keeping the button pressed.
- When a page starts printing, release the feed button.
- Tap the feed button again to print a second page, and all the cache will be cleared.
- Restart the printer and check for any improvements.
6. Reset the printer
- Power off the printer.
- At the back of your printer, locate the Reset button. Press and hold the button for a few seconds.
- Power on the printer while keeping the reset button pressed. You will see a page printing indicating the printer is resetting.
This should reset your printer to factory default. After the reset, you will have to reconfigure your printer as all the settings are discarded. If the issue persists, try reinstalling the printer.
7. Reinstall the Epson printer
- Make sure all the printer jobs are canceled.
- Power off your printer and then disconnect the data cable.
- Press the Windows key + R to open Run. Type control and click OK to open Control Panel.
- In the Control Panel, click on Uninstall a program under Programs.
- Choose your Epson printer from the list of installed apps and click Uninstall.
- You can now restart your computer. First, make sure you disconnect the printer.
- After the restart, connect your printer to the computer and follow the on-screen instructions to complete the installation process.
In conclusion, connectivity issues with your Epson printer can be frustrating, but they can be resolved with the right troubleshooting steps. If your Epson printer is not connecting to WiFi, check your WiFi password, network connectivity, printer software, and firewall and security settings. By taking these steps, you should be able to get your printer back up and running in no time.
Also check above here how to connect Epson printer to wifi router on windows and MAC computer easily.
I am Komal Hatwaani, aims to provide readers with informative and engaging content that covers everything from technology and business to entertainment and lifestyle. This website dedicated to delivering high-quality content that informs, entertains, and inspires our readers.
Join us on our journey as we continue to explore the ever-evolving landscape of news and information, providing you with valuable insights and perspectives that enrich your digital experience.